If you are a new parent sinking in newborn diapers. You're sick of tying each poopy diaper into a plastic grocery bag. It may keep the odor from overwhelming your home. In that case, Diaper Genies are an excellent solution! While Diaper Genies appear to be simple diaper garbage cans.
It is much more complicated than they appear. They can be challenging to understand. However, investing some time and research to learn how to use a Diaper Genie. Keeping your house from smelling like stinky diapers is well worth it!
Why Should You Use a Diaper Genie?
Using a Diaper Genie has numerous benefits. These are the following:
Odor Control: It is the main advantage of using a Diaper Genie. It can trap odors. It is rapping unpleasant smells in multiple layers of barrier bags. It keeps your baby's room fresh and odor-free.
Convenience: With its hands-free operation and simple design. A Diaper Genie helps save you time and effort. You do not need to go outside the trash can. It is most useful for late-night diaper changes.
Space Efficiency: They are compact and occupy little space. It is ideal for smaller spaces.
Eco-Friendly: Some models include refillable liners. These are made from biodegradable materials. It reduces your environmental impact.
How to use a diaper genie?
Step-by-step Instruction:
Now, I will try to cover the fundamentals. It's time to explore the step-by-step process for using a Diaper Genie effectively.
Step 1: Set Up Your Diaper Genie.
To begin using your Diaper Genie, you must first set it up correctly. Take these simple steps:
Choose the Right Location:
Choose a convenient location in your nursery or bathroom for your Diaper Genie. Keep it within reach. But out of direct sunlight or heat sources.
Gather Your Supplies:
Before you start the assembly process, make sure you have all the required components and tools. Typically, these include the central unit.
- A lid or top cover,
- An empty cartridge
- Refuel bag,
- Any other accessories specified in the product manual.
Step 2: Assemble Your Diaper Genie
Before using your new Diaper Genie, you must first assemble it. Here's how you can accomplish it:
Follow the Diaper Genie's assembly instructions:
Each model may have slightly different assembly instructions. Carefully read and adhere to the manufacturer's instructions to avoid confusion or mistakes during setup. Most units need simple snap-together installation without the use of any additional tools.
Follow the steps below to put collectively your Diaper Genie:
1.Unpack All Parts:
Begin by unpacking the Diaper Genie from its box. You should have three sections:
- Top (with the lid and button),
- Middle (with the cutter), and
- Bottom (where the diapers will be stored).
2. Connect The Sections:
Start by aligning the top and middle areas. They should fit together easily. Repeat the process for the middle and bottom sections.
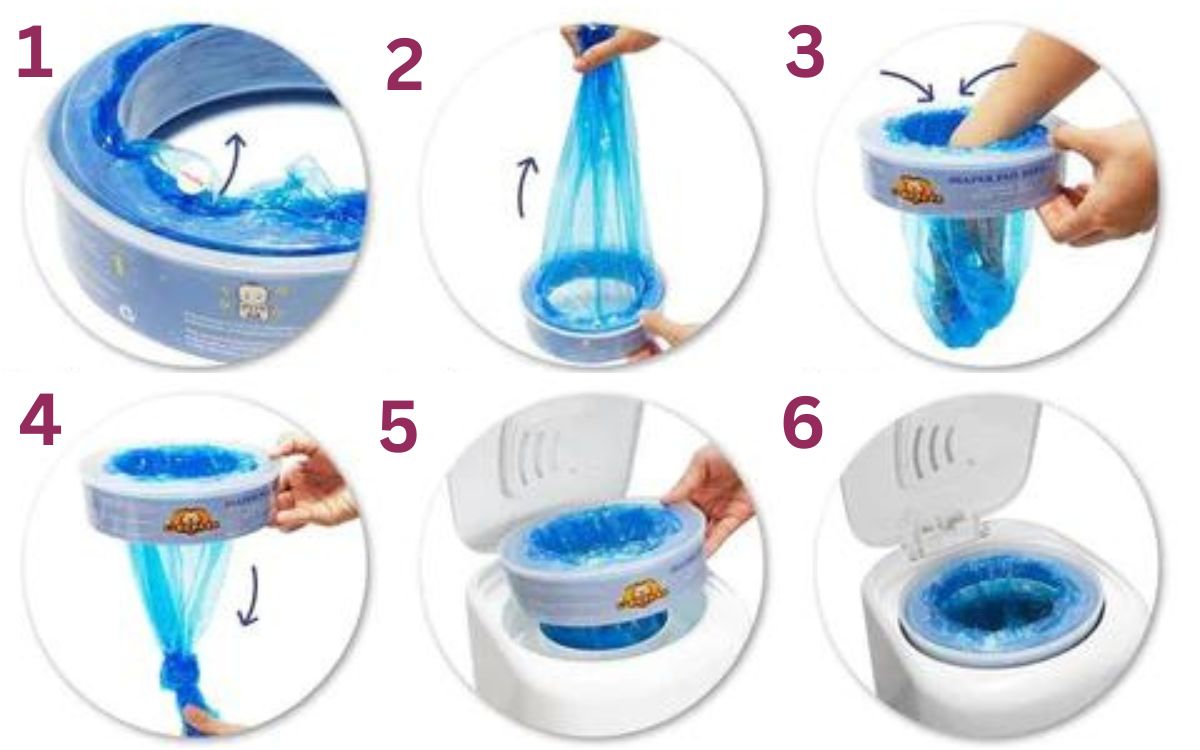
3. Install The Refill:
How do I install the refill or put the bags in the diaper genie? First, open the Diaper Genie lid and insert a refill cartridge. Pull the plastic down through the middle section. Then, tie a knot at the end. Close the lid and make sure the plastic hangs through.
4. Test The System:
Press the button or pedal to see if the lid opens. If the lid opens, the system is assembled correctly. You can see the plastic bag from the refill cartridge.
5. Preparing For Use:
It is now assembled and ready. To ensure optimal functionality, check the bag's fullness regularly. I replaced the cartridge as needed.
Step 3: Use Your Diaper Genie
After you've set it up. You can start using it. Here's a step-by-step guide for using your Diaper Genie effectively:
1. Open the Lid: To begin, lift the top compartment. Press the button on your Diaper Genie, depending on the model.
2. Place the Dirty Diaper Inside: Insert a used diaper into the opening at the top of the Diaper Genie. Push it gently down until it falls into the bag below.
3. Twist and Seal: After disposing of a dirty diaper, twist the handle or close the lid, depending on the model. This action seals off each dirty diaper separately. It prevents odors from escaping.
4. Continue Adding Diapers: Follow steps 2 and 3 for each dirty diaper you discard throughout the day. The convenient design enables you to dispose of diapers without touching.
5. Emptying the Diaper Genie
When your container is full, it's time to empty it. Take these steps:
- Open your Diaper Genie's bottom compartment or door.
- Use a built-in cutter or scissors to remove the sealed portion at the bottom.
- Tie off this section to make a separate bag filled with soiled diapers.
- Dispose of this bag in your regular trash can.
Step 4: Maintaining Your Diaper Genie.
Proper maintenance:
It is required to ensure your Diaper Genie keeps fresh and performs optimally.
Regularly empty it: Avoid letting it get too full before emptying it. This will keep any unpleasant odors from leaking out.
Replace bag refills:
When you run out, replace them right away to ensure continuous functionality.
Clean the unit: To keep it clean and germ-free. Wipe it down with a mild cleaning solution regularly.
Tips To Use A Diaper Genie Effectively
The key to effectively using a Diaper Genie. It is in good condition. I clean it regularly. This ensures that your Diaper Genie continues to provide a convenient and odor-free solution for diaper disposal.
- Regularly empty the Diaper Genie
- Use baking soda for extra odor control
- Use original refill cartridges for the best results.
- Keep your Diaper Genie clean
FAQ
How Many Diapers Does the Diaper Genie Hold?
The company claims that the refill bags can hold 270 diapers. Of course, this does not imply that you stuff 270 diapers into the can before throwing it away.
When you first set up the bag, tie a knot at the bottom. Once it's full of used diapers, use the specific cutter inside the pail to break it off and knot the top. Then, you'll pull out the next section of the bag tie it at the bottom, and so on.
Who Should Use The Diaper Genie?
Diaper Genie, Amazon's best-selling baby diaper pail if you have a child in diapers. Its design is sleek and discreet. It is available in five colors. It is white, gray, and green, making it appropriate for most nurseries. Furthermore, its tall size and hands-free foot pedal make tossing diapers easier on your back
Conclusion: How to use Diaper Genie.
The Diaper Genie is essential for new mothers. It offers a simple and sanitary way to dispose of dirty diapers. You can follow my guide to using a Diaper Genie effectively. You will be able to keep your nursery clean and odor-free. So, embrace this fantastic invention. It makes diaper changes a seamless part of your parenting routine!
Remember to prioritize safety, gather supplies, and take each step carefully. This will help you and your child live in a clean, odor-free environment.